What are Sales Invoices within Parish and Town Councils
Sales invoices are essential for documenting revenue in Town and Parish Councils. They're formal documents that suppliers send to councils after providing goods or services. By detailing the items or services delivered, the price, and payment terms, sales invoices serve as a record of the transaction between both parties. These invoices help councils monitor their income and maintain transparency in financial operations. By properly managing sales invoices, councils can ensure they adhere to the necessary financial regulations and practices when receiving goods or services.
Sales Invoices within Scribe Accounts
**Available on Professional & Premium only **
Scribe Accounts has a specific transaction type called Sales Invoices which allows you to raise sales invoices to then send to your customers. The data entered for an invoice can be automatically transferred to the receipt transactions when the payment takes place. This feature eliminates duplication and saves you valuable time and effort, making the entire invoicing process more efficient and accurate.
However, it's important to note the sales invoices do not constitute transactions and are not part of the accounts until payment is received and the invoice is converted to a receipt.
For those working in I&E, Scribe will produce a "YE Debtors" report that sits under your Year End menu. This will list all part paid and outstanding invoices, grouped by cost code, which can assist in entering your Year End adjustments.
Where are Sales Invoices Within Scribe Accounts?
Log into Scribe Accounts and navigate to menu Transaction → Sales Invoices alternatively click here
How to Add a Sales Invoice
💡 Learn how to customise sales invoices here - this will need to be done before you produce an invoice. 💡
💡 Learn how to email invoices directly to customers and update the council's correspondence email here. 💡
Log into Scribe Accounts and navigate to menu Transactions → Sales Invoices
All entries for the current year will be listed here with the most recent entry shown at the top. You can then click the + button to add a new record or under the Edit button of top right hand corner select "Add Sales Invoice”'
The entry screen has three sections of information to complete which are dealt with below. The asterisk (*) denotes mandatory fields.
| Field | Tips |
| Tender* | How payment is expected to be received - this can be changed upon receipt if necessary. Select from Online Payment (e.g. BACS), Direct Debit, Standing Order, Card, Cheque or Petty Cash. |
| Bank* | Select the bank account payment is to be made into. If you have selected Petty Cash as the Tender the Bank field will disappear as it is not relevant in this case. |
| Description* | A description of the item/service to be supplied. Select an existing description from the drop down list or select Create New to add a new description. |
| Customer* | Select an existing customer from the drop down list or click the "+" button to add a new customer and enter relevant details. |
| Date* | The date the sales invoice is raised (defaults to "today") |
| Due Date | The date on which you expect the sales invoice to be paid |
| Purchase Order Date | The date on which the purchase order is received (if applicable) |
| Purchase Order Number | The purchase order number which relates to this invoice (if applicable) |
| Name | The name of the item/service you are supplying (e.g. hall hire) you can add multiple items. |
| Cost Centre* | Select the cost centre from the dropdown list - this will be allocated to the subsequent receipt. |
| Cost Code* | Select the cost code from the drop down list - this will be allocated to the subsequent receipt. |
| VAT Type* | Select from the pre-filled VAT types that which applies to the item (Exempt, Standard, Lower etc). |
| Net* | Enter the net value |
| VAT* |
Will automatically be calculated based on VAT rate selected and net amount |
| Total* | Will automatically be calculated based on VAT rate selected and net amount |
| Print Notes | Enter any additional notes you would like to include on your invoice |
| Footer Text | Select the a footer text template from the drop down list. (You can create custom invoice and purchase order templates in your council settings. Navigate to Account → Council Settings) |
| Payment Ref | A reference relating to the payment can be recorded here later if necessary (e.g. cheque number). |
| Minute Reference: | If applicable |
| Attached Files | Click Upload to select files to save against the record (e.g. the supplier invoice). |
How to Edit a Sales Invoice
If you realise an error has been made when a sales order was entered, it can be edited to correct it.
Note* Once an invoice has been paid or partially paid no further amendments or corrections can be made and the "Save" button will disappear.
- Navigate to the menu Transaction → Sales Invoices
- Bring up the entry screen and the list of sales invoices
- On the entry you want to edit click on the three dots and 'Edit'.
- Make sure all the details are entered correctly and update any necessary information.
- Once you have made the changes, click 'Save' to update the sales invoice.
How to Delete a Sales Invoice
Any invoices can be deleted if no longer needed, but they will remain outstanding until converted to a receipt or deleted. You may therefore need to periodically delete any which you know will never be paid and converted into a receipt.
- Navigate to the menu Transaction → Sales Invoices
- Bring up the entry screen and the list of sales invoices
- On the entry you want to edit click on the three dots and 'Delete'.
- Check the details and click ‘Delete’
How to Find Sales Invoice Record(s)
Navigate to menu Transaction → Sales Invoice and you will find the quick search and filter options.
See Searching, Sorting & Filtering Records Lists for more details.
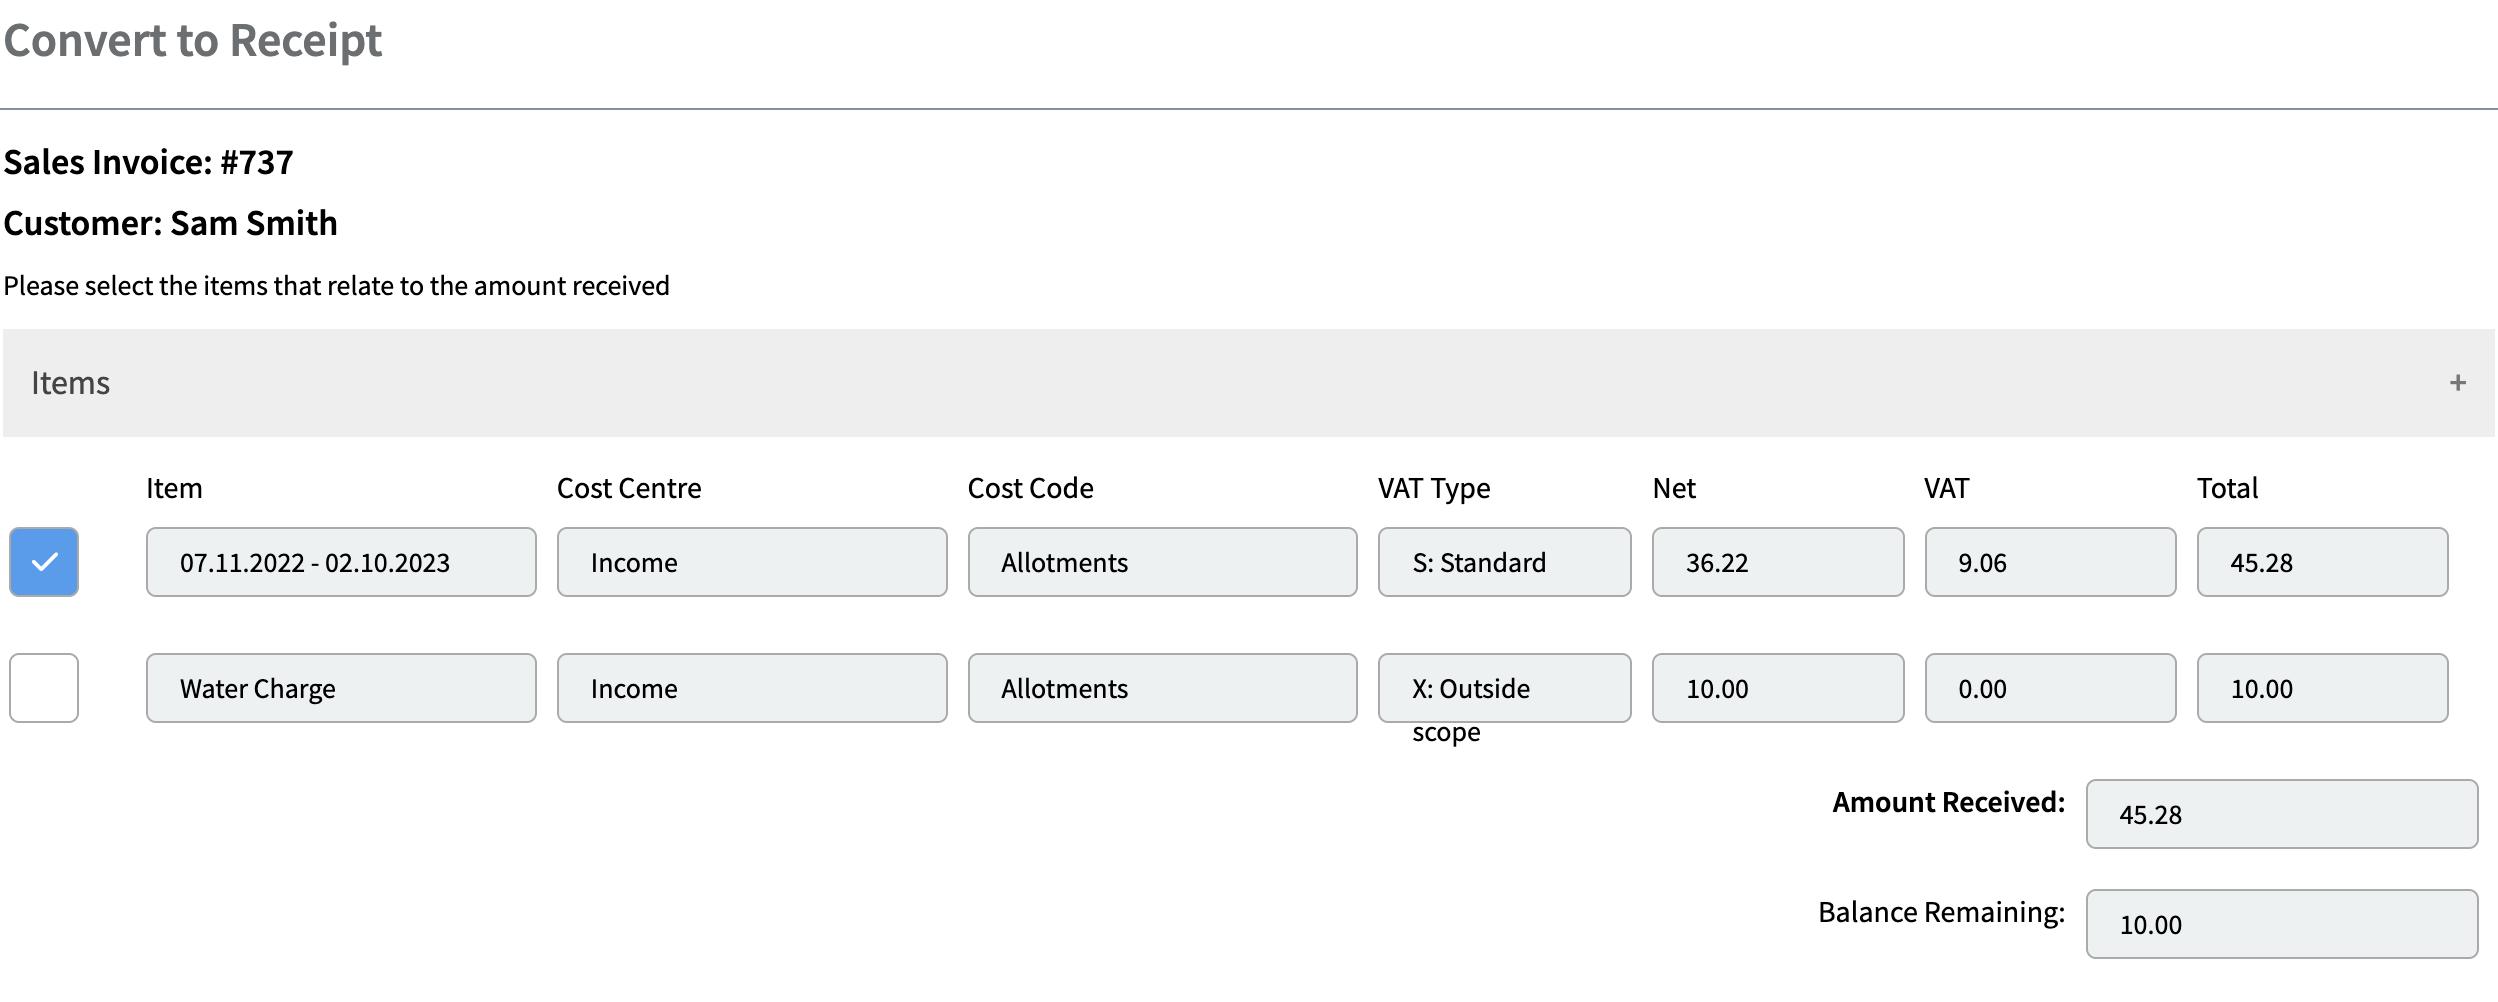
How to Convert the Sales Invoice to a Receipt
Once payment has been made, you can convert the invoice to a receipt
Navigate to menu Transaction → Sales Invoice on the entry you want to convert click on the three dots and select ‘Convert to Receipt’
Multiple items will be ticked by default, any items not yet paid can be unticked.
If the line is only part paid amend the amount at the receipt stage and this will show as Part Paid on the sales invoice.
Once you select 'Convert' all invoice details will feed through into the receipt transaction which will take the next available voucher no. You can double check the details and then select 'Save' to create the receipt.
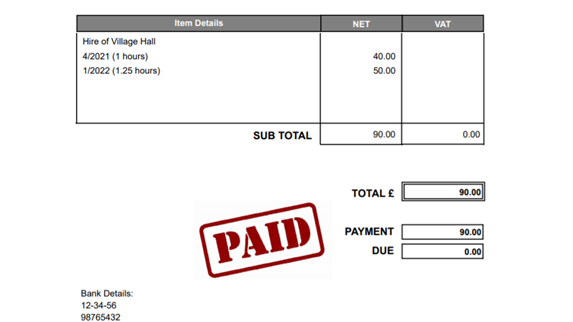
The sales invoice status will update from 'Outstanding' to 'Paid' or 'Part Paid' depending on the amount received. When full payment is received, the invoice will show a 'PAID' stamp.
Related Payments
What you'll also see when converting a sales invoice to a receipt, is that Scribe will link both together. By simply clicking into a sales invoice, you are able to view all the receipts that relate to that specific invoice under the related records section, as well as go directly to them by clicking on the link.
When you click into a receipt, you'll also see the link to the related sales invoice. The invoice/Order number will show the financial year, scribe invoice number and if entered relevant Purchase order number.
Duplicate a Sales Invoice
You can duplicate invoices regardless of whether they are paid, part paid, or outstanding. To do this you'll need to find the sales invoice and select three dots and ‘Duplicate’. A screen similar to entering a new sales invoice will appear and Scribe will take the next available invoice number. All the details will be duplicated so you may need to make some amendments, such as the invoice date. Once you've done this, select save and your new invoice will appear at the top.
Changing the Payment Status (available to Admin Users only)
If you have not converted an invoice to a receipt you may wish to manually set the payment status to 'Paid'.
This can be completed via the edit option.
Once editing the invoice navigate to the additional details section and click on the 'status' dropdown, amend the status to the correct setting.
Click on 'save' and your invoice will show the updated status.
Show a Sales Invoice as Refunded
If you've given a refund to a customer who was invoiced, you'll need to find the original sales invoice and select the three dots and ‘Refund.’ You'll then be prompted to enter the amount refunded (as a negative value). Select Refund and Scribe will pull through all the details, taking the next available receipt number. This record will then appear under your receipts and will link to both the sales invoice and the original receipt.
How do I link a Sales Invoice to a Receipt
If you have not converted the invoice to a receipt you may wish to link the invoice manually, this can be completed via the edit option.
Once editing the invoice click on the related records section, this will drop down and the link option will become available.
Click on the link button and add in the transaction id.
What happens at Year End?
Your accounts should reflect the transactions that take place. If you have an order dated in March and make payment in April, you will record the payment in April as that is when the transaction took place.
The purchase orders are just documents and don't feature in the year end accounts. However, if you're working in income and expenditure, you'll need to adjust for any orders sent out in the old financial year which have not been paid.
The purchase order numbering system will continue between financial years. All outstanding and part paid orders will also feed through into the new year, with the year they were raised appearing next to their order no. for clarity.
Any purchase orders can be deleted if no longer needed, but they will remain outstanding until converted to a payment or deleted. You may therefore need to periodically delete any which you know will not be paid and converted into a payment.