Scribe Bookings and Scribe Accounts will automatically be linked to one another, making it simple to invoice your customers for their bookings. Block bookings are sent to Accounts in the usual way which can be viewed here, however, there is a further option to set the invoice itemisation.
Send block bookings to Accounts
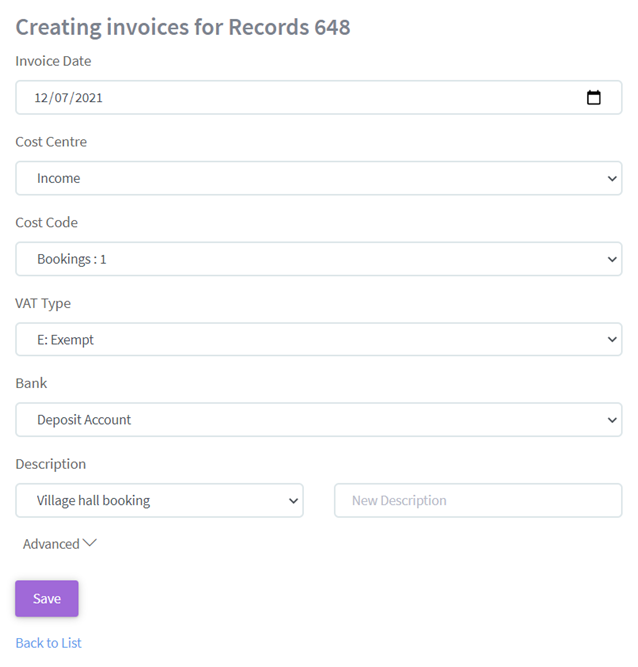
- Go to Bookings > select 'More' next to the booking you wish to invoice and click on 'Send to Accounts'. Here you can allocate the booking to a cost centre and cost code, select the VAT type, bank account and add a description.

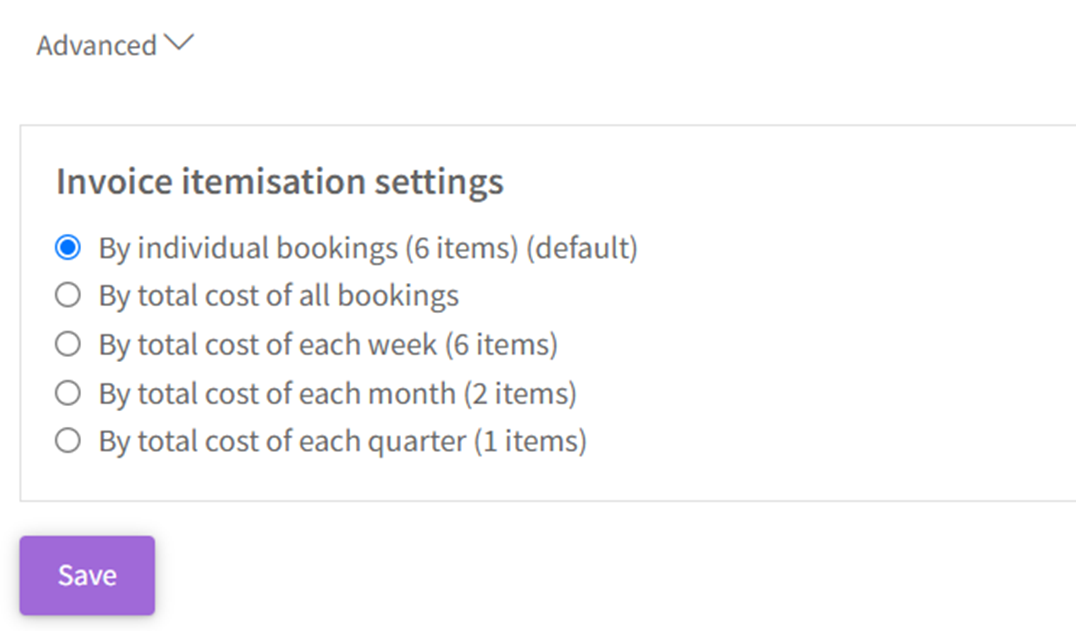
- The further option to set the invoice itemisation sits under the Advanced tab, as shown below. There are currently five options and each will show in brackets how many items will appear on the invoice. The default is set to 'By individual bookings'.

Invoice itemisation options:
- By individual bookings (default) - the invoice will give a breakdown with each individual booking as an item. You will see the date, time and amount charged for each individual item with the sub total calculated beneath this.
- By total cost of all bookings - the invoice created will give the date range of the block booking and include the number of bookings in brackets. The full amount charged will be displayed against this item.
- By total cost of each week - the items that appear on the invoice will be broken down by week and the text will read e.g. 'Week 47 of 2021', rather than show the date and time of the booking. You will again see the number of hours the venue has been booked for, the amount charged for each individual item and the sub total calculated beneath this.
- By total cost of each month - the items that appear on the invoice will be broken down by month and the text will read e.g. 'Month 9 of 2021', rather than show the date and time of the booking. You will again see the number of hours the venue has been booked for, the amount charged for each individual item and the sub total calculated beneath this.
- By total cost of each quarter - the items that appear on the invoice will be broken down by quarter and the text will read e.g. '3/2021', rather than show the date and time of the booking. You will again see the number of hours the venue has been booked for, the amount charged for each individual item and the sub total calculated beneath this.
Simply click on the circle next to the option you wish to choose and select 'Save'. A blue icon will appear next to the booking invoiced, by clicking on this you will be able to view the sales invoice in your accounts and download, share or print as usual.
Receiving Payment
- When you've received payment, simply go to Transactions > Sales invoices > select 'More' and 'Convert to Receipt', this will now appear as a receipt transaction that you will be able to reconcile during your monthly reconciliation.
- If you head to Transactions > Sales Invoices, you will also see that the payment status has changed from 'Outstanding' to 'Paid' or 'Part Paid' depending on the amount received.
- From here you can also select 'View in Bookings' to go back to the original record. The status will automatically change from 'Provisional' to 'Confirmed'.

Did you find this article helpful?
0 of 1 found this article helpful.
0 of 1 found this article helpful.
Can't find what you're looking for?Log a ticket